> For the complete documentation index, see [llms.txt](https://guides.stellaraio.com/stellar/llms.txt). Markdown versions of documentation pages are available by appending `.md` to page URLs; this page is available as [Markdown](https://guides.stellaraio.com/stellar/installation-uninstallation/how-do-i-move-stellaraio-to-a-new-pc-server.md).
# Move Stellar to a New PC or Server
Transfer your Stellar AIO 4.0 setup to another PC or Windows server, reset your license, and check everything before running tasks.
Moving to another PC or a Windows server involves two steps: transferring your saved setup and activating your license on the new machine. Use **Settings → Data Management** to export your setup from the old machine, then import it on the new one.
A server is another computer that you access remotely. Install and run Stellar on the server itself. If you are switching between Windows and Mac, see the [Windows/Mac transfer guide](https://guides.stellaraio.com/stellar/installation-uninstallation/how-do-i-move-stellaraio-from-pc-mac-to-mac-pc).
**Your setup is stored locally.** Stellar does not store a cloud copy of your tasks, proxies, profiles, accounts, or settings. Resetting your license key lets you activate another computer; it does not transfer your data.
### Before you start
**Choosing a server:** Servers are not recommended for Target. Pokémon Center can be run on a server. Check the retailer guide and the [Servers guide](https://guides.stellaraio.com/stellar/getting-started-with-stellaraio/servers) before moving your setup.
* Update Stellar on both computers to the latest 4.0 version. The current transfer format is **.stellar**. Older 4.0 export files are no longer supported by the current importer, so create a fresh export from the updated app.
* Keep access to the old PC or server until you have checked that the transfer worked. Do not delete its data, wipe it, or cancel the old server yet.
* Stop your tasks before exporting. Keep them stopped while you move, and review **Settings → General → Auto-Start Tasks on Restart** before importing.
* If the new computer already has a setup you want to keep, make a backup before importing. You will be asked whether to add the incoming data or erase the existing data first.
### 1. Export from your old computer
1. Open Stellar AIO 4.0 on the computer that has the setup you want to move.
2. Open **Settings → Data Management**.
3. Click **Export Data**.
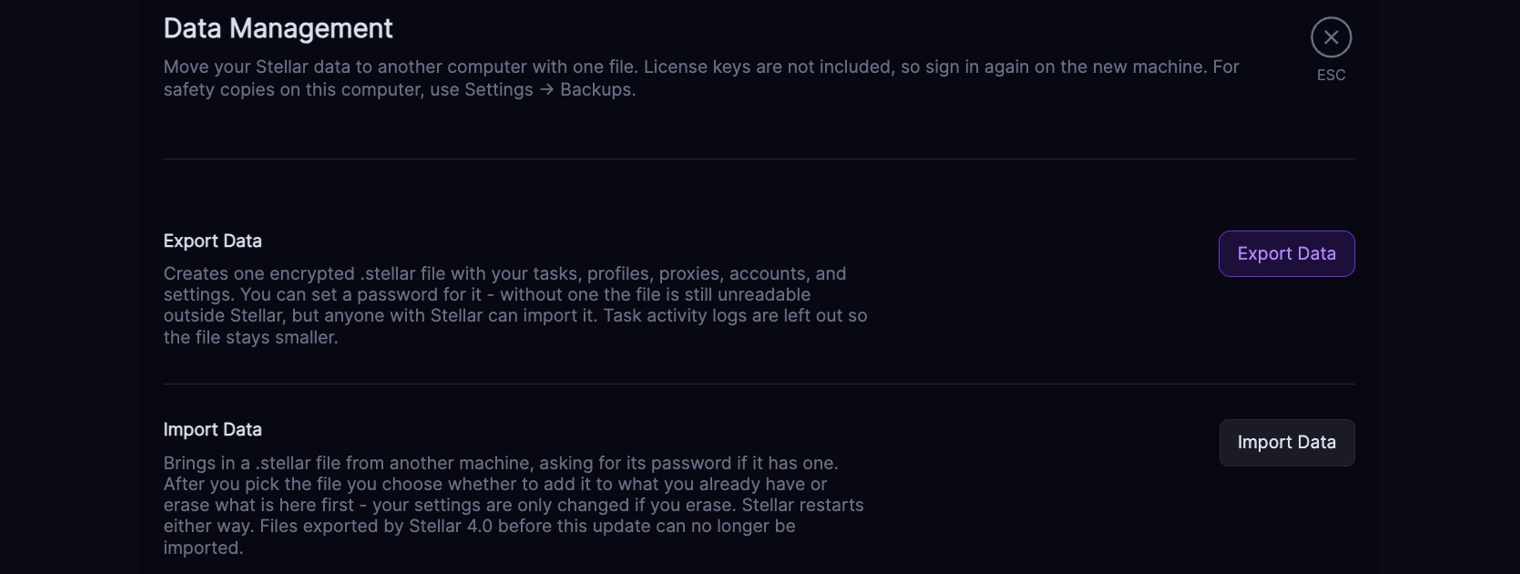 The export contains your tasks, profiles, proxies, accounts, and settings in one encrypted **.stellar** file. Your license key and task activity logs are not included.
1. Choose whether to protect the file with a password. A password is recommended because the file contains your saved setup and personal information.
2. Keep that password somewhere safe. A forgotten export password cannot be recovered.
3. Click **Export** and save the file somewhere you can find it again.
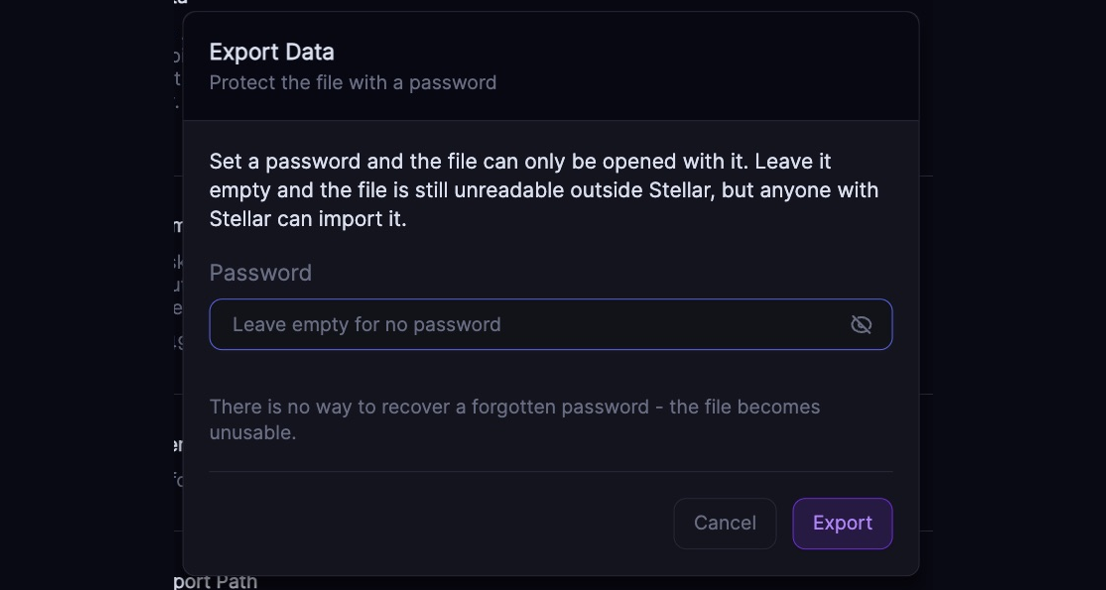 Without a password, the file is still unreadable outside Stellar, but anyone with Stellar can import it. Keep the file private either way.
**Tip:** Default Export Path is for CSV and other table exports. It is not the location setting for this device-transfer file.
### 2. Copy the file to your new PC or server
Copy the exported **.stellar** file using a USB drive or another private transfer method you trust. If you email it to yourself, use a password-protected export and keep the password separate from the attachment.
If you are moving to a server, connect to it with your remote desktop app and copy the file onto the server itself. A file saved only on your local PC is not yet on the server. Save a copy on the destination machine before continuing. Do not rename it to **config.json** or try to open and edit its contents.
### 3. Install Stellar and activate your license
1. Download the latest Stellar AIO 4.0 installer for the new computer from [#change-log](https://discord.com/channels/1417577339671285984/1417581765295472830). For a Windows PC or Windows server, use the Windows installer. If moving to a server, run the installer inside the server’s remote desktop session.
2. Follow the [download and installation guide](https://guides.stellaraio.com/stellar/installation-uninstallation/how-do-i-download-stellaraio-windows-and-mac).
3. After your export is safely copied, fully quit Stellar on the old computer.
4. Open **License Key Management** in your Stellar membership on Whop and reset your key to release it from the old computer.
5. Open Stellar on the new computer and activate it using your license key.
See [How Do I Access and Manage My Account?](https://guides.stellaraio.com/stellar/how-do-i-access-and-manage-my-account) for help finding and resetting your key.
### 4. Import your setup
1. On the new computer, open **Settings → Data Management**.
2. Click **Import Data** and select the **.stellar** file you transferred.
3. If you protected the export with a password, enter that password.
4. Read the import choices carefully before confirming.
* **Add to existing data:** brings the incoming data into the current setup. The destination computer's settings stay unchanged.
* **Erase existing data first:** replaces the destination setup and applies the imported settings. Only choose this when you are ready to replace what is already on that computer and have backed up anything you need.
Stellar restarts after either import choice. Let it finish before checking your setup.
**Import from Stellar 3.0 is a different feature.** It reads a 3.0 installation on the same computer. For this 4.0 computer-to-computer transfer, use **Export Data** and **Import Data**.
### 5. Check your setup before running tasks
* Check that the expected task groups, profiles, proxies, and accounts are present.
* Review Settings, especially if you chose to add data and kept the new computer's existing settings.
* Check any computer-specific settings, such as a custom browser path or export folder. A path from the old PC may not exist on the new PC or server.
* Install Google Chrome if you use Captcha Harvesters, then check the relevant retailer and harvester guides before starting tasks.
* Check that your proxies work from the new machine. If your provider uses IP authorization, review its setup for the new PC or server.
* If you use the Mobile Companion App, check Remote Access and pair the new computer as needed. Stellar must stay open on that computer for mobile control.
Keep your original data and a private copy of the transfer file until you are satisfied everything you need is available on the new computer.
### Keeping Stellar running on a server
Stellar must remain open and the server must stay powered on for tasks or mobile control to work. Disconnecting a remote desktop session is different from signing out of Windows. Signing out, shutting down, or restarting the server interrupts the apps running in that session.
Follow your server provider’s instructions for keeping a session running. If you are unsure how its remote desktop controls behave, check with the provider before leaving tasks running.
### Need help?
If an import fails, check that both computers use the latest 4.0 version and make a fresh export from the old computer. Renaming an older file will not convert it to the new format.
If you only have an older export, cannot access the old computer, or are unsure which import choice to use, open a **Support Ticket** in [#open-ticket](https://discord.com/channels/1417577339671285984/1417909247756468396) before deleting or overwriting anything. Include the Windows/Mac versions, Stellar versions, and exact error message. Do not post your transfer file, license key, passwords, or profile details in a public channel.
For license or membership issues, choose an **Admin Ticket**.
---
# Agent Instructions
This documentation is published with GitBook. GitBook is the documentation platform designed so that both humans and AI agents can read, navigate, and reason over technical content effectively. Learn more at gitbook.com.
## Querying This Documentation
If you need additional information that is not directly available in this page, you can query the documentation by asking a question.
Perform an HTTP GET request on the following URL with the `ask` and `goal` query parameters:
```
GET https://guides.stellaraio.com/stellar/installation-uninstallation/how-do-i-move-stellaraio-to-a-new-pc-server.md?ask=&goal=
```
`ask` is the immediate question: it should be specific, self-contained, and written in natural language.
`goal` is what the user is ultimately trying to achieve, the reason they need the answer. Sharing it helps GitBook give you a better, more relevant answer. A goal is most helpful when it describes the outcome the user wants rather than restating the question. For example, with `ask=how do I create an API token`, a goal like `automate deployments from our CI pipeline` lets GitBook tailor the answer to that use case.
The response will contain a direct answer to the question and relevant excerpts and sources from the documentation.
Use this mechanism when the answer is not explicitly present in the current page, you need clarification or additional context, or you want to retrieve related documentation sections.